The Hookmark context window is one of the two data windows Hookmark offers. This window reflects whatever was in the foreground when you invoked it. This document deals with the context-sensitive window. The other data window is the Bookmarks window
When you invoke Hookmark on an item, you’ll see the Context window with its Title bar. You might also see up to three sections: HOOKED, INDIRECTLY HOOKED, and RELATED items.
1. The Title bar and Action menu
![]()
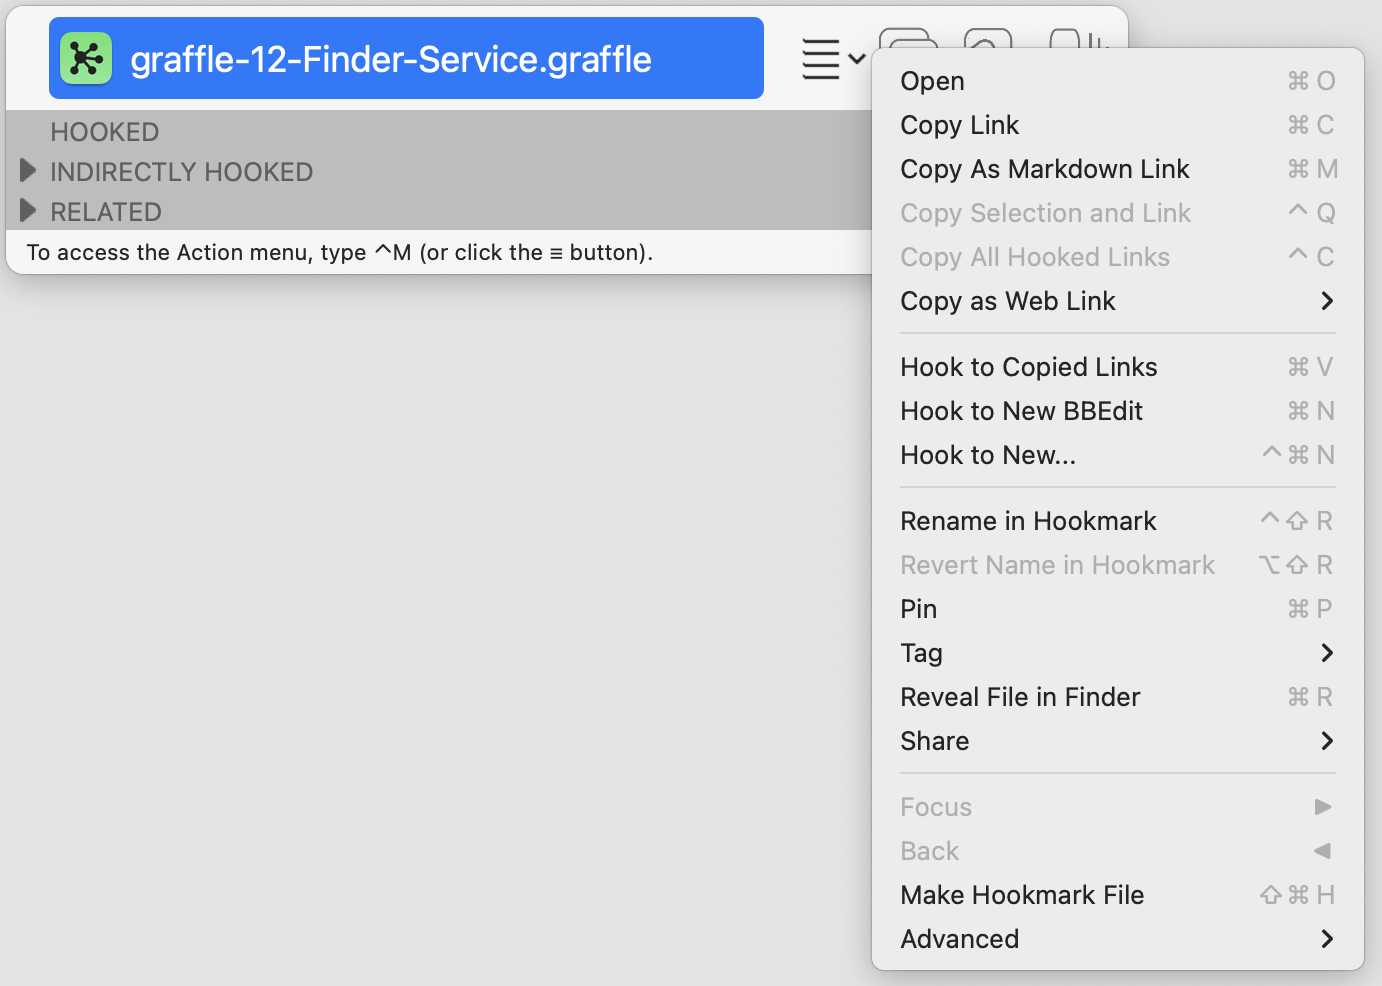
If you click on the Title bar, you’ll see some handy commands:
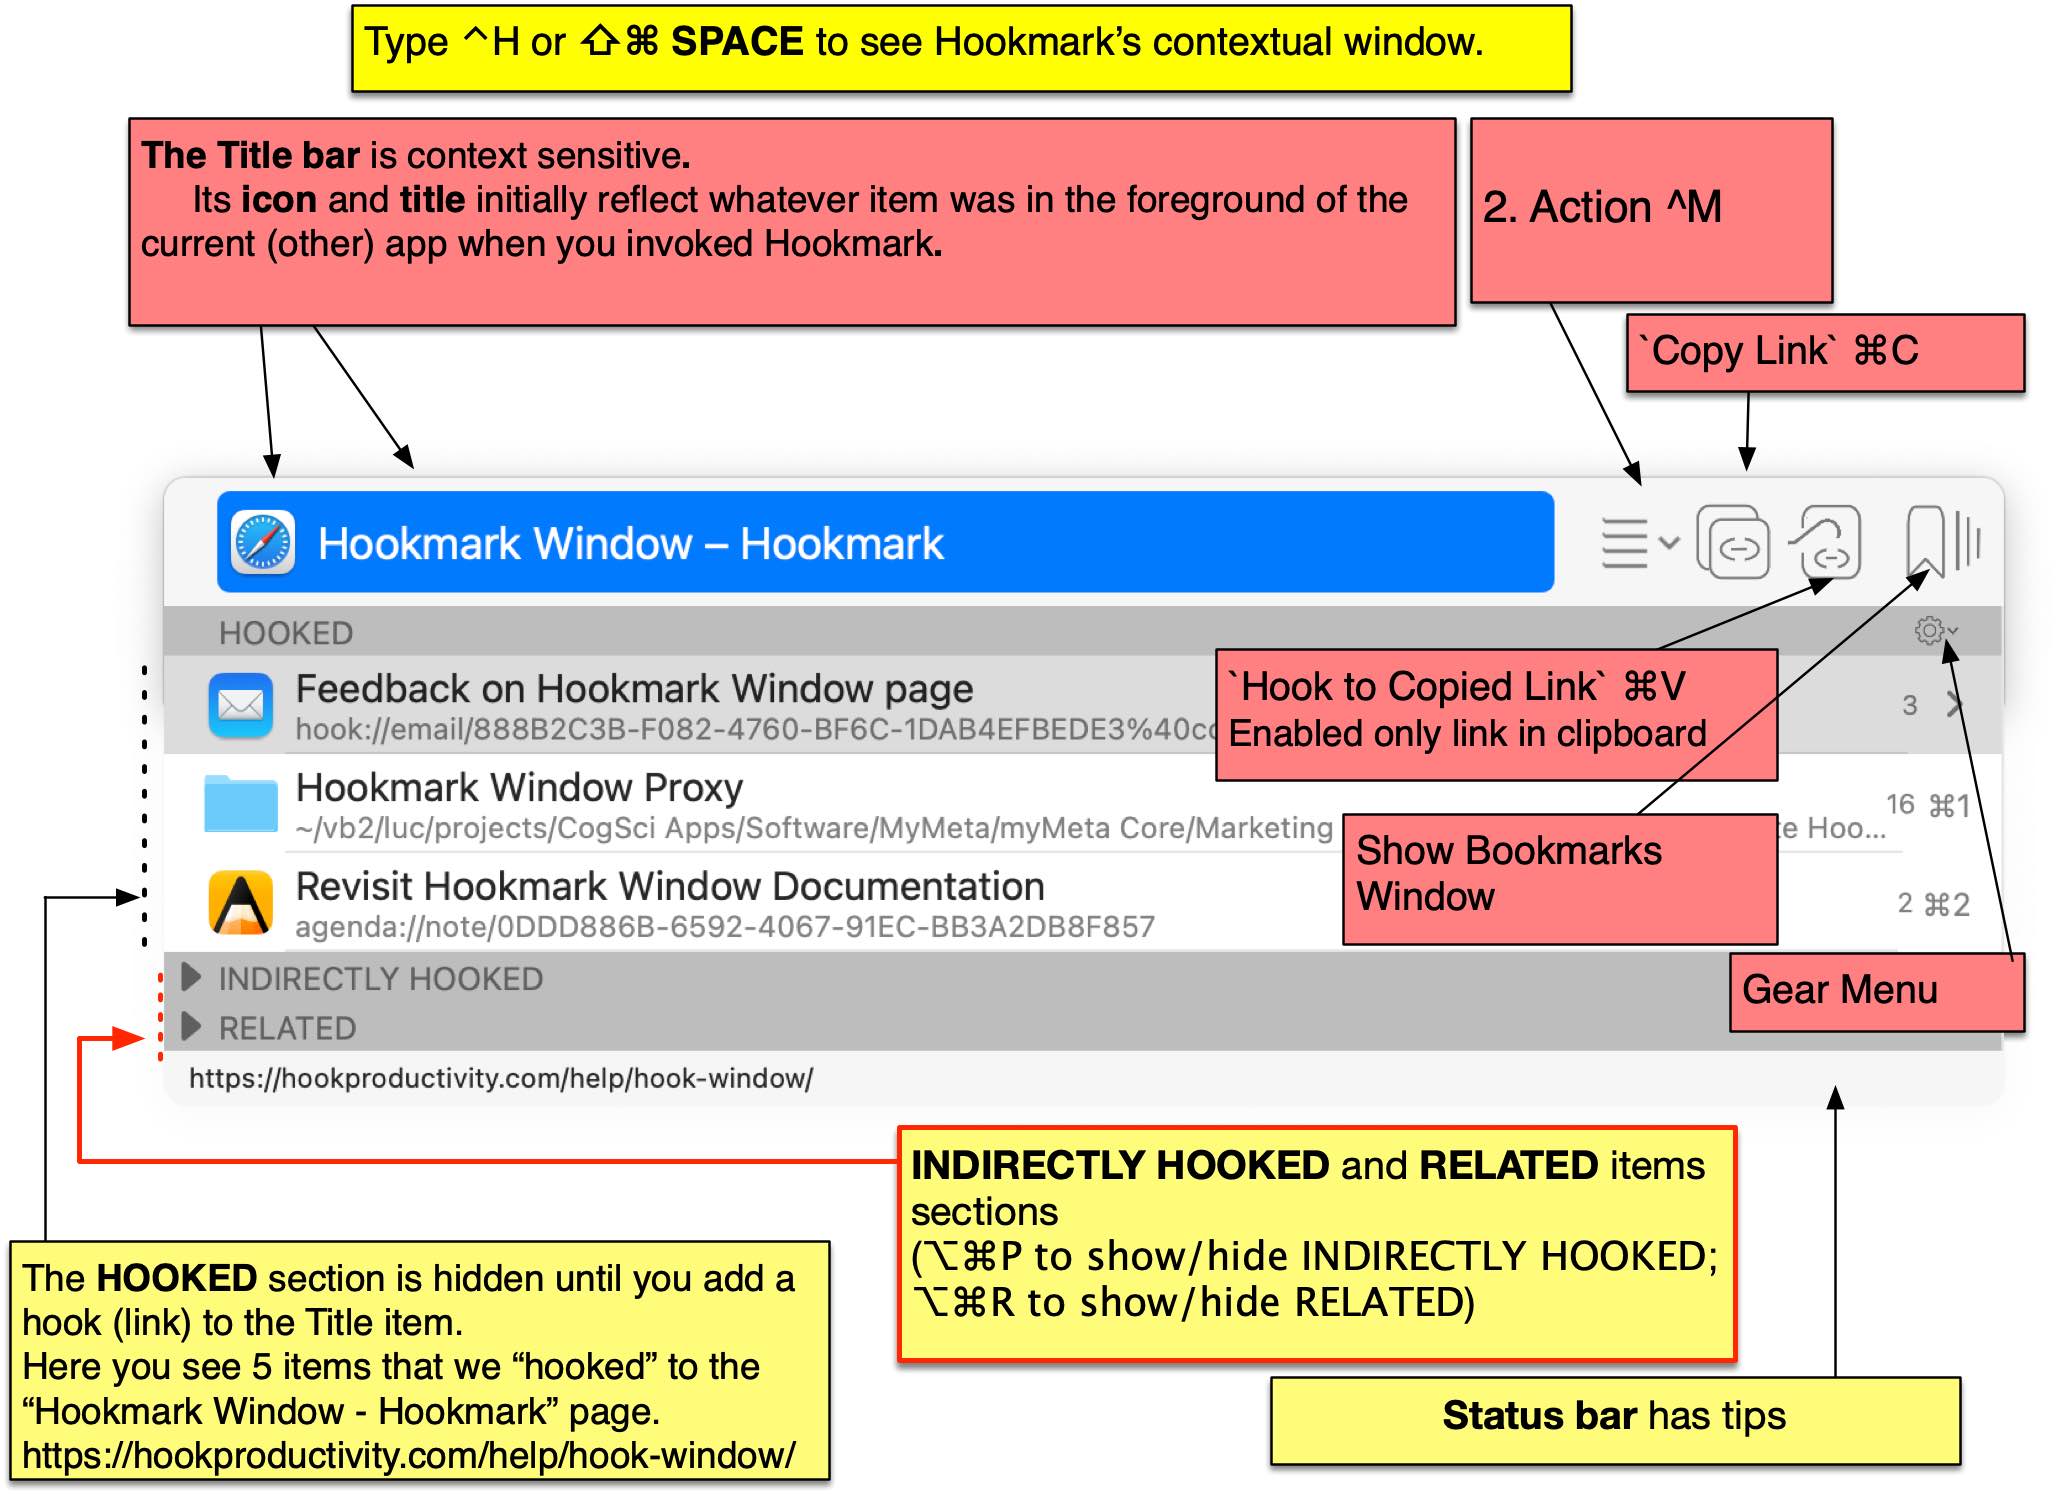
The title bar contains the name of the title item, which is initially the name of the document or item that was active when you invoked Hookmark.
For example, if you invoke Hookmark on this page (⌃M), the title bar says “Hookmark Context window – Hookmark”, which is the title of this web page.
The title bar has an Action menu ☰ button and other buttons. The main entry to Hookmark is that Action button.
When you click on the Action button (☰) in Hookmark’s title bar with (or type ⌃M in Hookmark), you see the “Action menu”. The Action menu has the main commands you’ll use to copy and create links. All Action menu commands operate on the currently selected item, whether it is the title item or a hooked link.
The contents of Hookmark’s Action menu:
- Open: the title item
- Copy Link, which copies the name and address of the title item into the clipboard as a link that you can paste or use in “Hook to Copied Link” (same effect as Hookmark’s
Copy Linktoolbar button). - Copy As Markdown Link does the same thing as the previous command but in Markdown format (Pro Only).
- Copy Selection and Link copies a quote and a link, in Markdown, rich text and HTML formats. This only works for certain apps (such as PDFpenPro, Preview, Skim).
- Copy All Hooked Links copies all the links shown in the HOOKED section to the clipboard.
- Copy as Web Link
- Copy As Universal Link ⌥⌘C This copies a link suitable for pasting in web apps like Google Docs, Notion and Discourse which neuter custom links like
x-devonthink-itemandhook:// - Copy As Universal Markdown Link ⌥⇧⌘M
- Copy Selection and Universal Link ⌃⌥Q For copying a quote and universal link.
- Copy As Universal Link ⌥⌘C This copies a link suitable for pasting in web apps like Google Docs, Notion and Discourse which neuter custom links like
- Hook to Copied Link is only enabled if there is a link in the clipboard (e.g., from “Copy Link” above). This command hooks (links) the selected item to the target (URL) of the copied link (same effect as Hookmark’s
Copy Linktoolbar button.) This is the command that makes hooked links appear in the Hookmark context window. NB: this command appears asHook to Copied Links(plural) if there are multiple links in the clipboard. -
Hook to New
<default note taking app>is the same as the previous command but instantly uses your default note-taking app. - Hook to New… creates a new item in an app that you choose and links the new item to the title item (very handy for note-taking and other purposes).
Rename in Hookmark: This enables you to rename a bookmark. Next time you useCopy Linkyou’ll get the new name. (Revert the name in the Advanced menu).-
Revert Name in Hookmark: This sets the name of the bookmark back to its original name (assuming you have renamed it yourself). Next time you useCopy Linkyou’ll get the original name. -
PinandUnpin: This adds or removes the bookmark to or from the Pinned section of theBookmarks window. Tag: This allows you to apply tags to links, and edit tags (requires v. 6.1 or later).- Reveal File in Finder which is only enabled if the title item is a file (of course), in which case it reveals the file in the Finder.
Reveal Page in Pinboardis only shown if the selected item is a web page, and you have enabled Pinboard integration.- Share: a share sheet for the item in the Title bar.
Back: Hookmark’s contextual window is also a link browser/navigator. If you “focused on” a particular link (using focus command or right arrow), this will unfocus, i.e., go back.-
Make Hookmark File(Pro only). This creates a.hookmarkfile (in Finder). The name of the file is is same as whatever is selected. It contains a URL to whatever is selected. Opening the created.hookmarkfile opens the Title item. (It’s a better alternative to Finder aliases and .webloc files.) -
Advanced >
Open All Hooked Items.- Copy as Path
- Copy as File URL
- Copy Link for Apple Mail. This copies a link that is appropriate for Apple Mail. This works around a bug in macOS 14 and macOS 15 regarding how links are pasted.
Add Bookmark Without Copying.Delete in Hookmark.This completely removes from Hookmark the bookmark for this item, and all the hooks (but not _their) bookmarks).
2. HOOKED links section
When you invoke the Hookmark context window (⌃H), the HOOKED section shows everything that you previously “hooked” (bidirectionally linked) to the Title item. (See Hook to Copied Link in getting-started.)
If there’s nothing hooked to the Title item, then this section will not be shown.
Each item in the HOOKED section represents a bidirectional link from the Title item.
Selection of hooked item
If you click on a hooked link, it will be selected; then when you apply an Action ☰ button command it will apply to that item.
Navigating the Hookmark context window
You can also navigate (browse) the network of hooked links using arrow keys or by clicking. Hookmark supports many standard keyboard shortcuts (e.g., emacs style keyboard bindings). For instance if you select a link and click its > button, the Hookmark context window will focus on the link. When you focus on an item (i.e., “navigate to it”), the title bar of the Hookmark context window takes the name of the hooked item. Try it out, and check out “navigating linked items”.
3. INDIRECTLY HOOKED
Hookmark can show you items that are hooked to items that you’ve hooked. That’s a “flat” (list) view of the hooked link network in relation to the title bar item.
Show or hide the INDIRECTLY section via the Gear menu’s view menu or by typing ⌥⌘P.
4. RELATED items section
This is discussed in more detail here.
Hookmark can show you items that seem to be related to the title item. For example, if you are reading a PDF with its DOI in its footer, Hookmark will use that information to look up the PDF’s web page and include a link to the web page in the RELATED section.
Please note that:
- You can show/hide the RELATED section with a keyboard shortcut (
⌥⌘R); via the Gear menu; by typing or via Hookmark’s General Preferences pane. - You can expand or collapse the RECENT section using keyboard shortcut (⌥⌘9, ⌥⌘0) or by clicking on the triangles.
- You can also focus on (“navigate into”) recent items.
5. The Status bar (bottom of window)
At the bottom of the Hookmark context window is a status bar. It displays helpful context-sensitive messages. If the current app is unsupported or Hookmark just cannot find a valid file or linkable resource, the status bar will say “No linkable found in the app”. But normally, the status bar presents tips, such as listing available commands and keyboard shortcuts.
Gear menu in Status bar
On the far right side of the Status bar is a Gear menu. To access the gear menu, click on the gear menu or type ⌃G. Whereas the Action menu and the Link menu are context-sensitive, operating on the title item and selected link, respectively, the Gear menu contains global commands (that do not vary as a function of the Title item or link-selection).
See Gear menu for more information on that menu.